Starbeamrainbowlabs

Stardust
Blog


Archive


Mailing List Articles Atom Feed Comments Atom Feed Twitter Reddit Facebook

Tag Cloud

3d 3d printing account algorithms android announcement architecture archives arduino artificial intelligence artix assembly async audio automation backups bash batch blender blog bookmarklet booting bug hunting c sharp c++ challenge chrome os cluster code codepen coding conundrums coding conundrums evolved command line compilers compiling compression conference conferences containerisation css dailyprogrammer data analysis debugging defining ai demystification distributed computing dns docker documentation downtime electronics email embedded systems encryption es6 features ethics event experiment external first impressions freeside future game github github gist gitlab graphics guide hardware hardware meetup holiday holidays html html5 html5 canvas infrastructure interfaces internet interoperability io.js jabber jam javascript js bin labs latex learning library linux lora low level lua maintenance manjaro minetest network networking nibriboard node.js open source operating systems optimisation outreach own your code pepperminty wiki performance phd photos php pixelbot portable privacy problem solving programming problems project projects prolog protocol protocols pseudo 3d python reddit redis reference release releases rendering research resource review rust searching secrets security series list server software sorting source code control statistics storage svg systemquery talks technical terminal textures thoughts three thing game three.js tool tutorial twitter ubuntu university update updates upgrade version control virtual reality virtualisation visual web website windows windows 10 worldeditadditions xmpp xslt

Forgotten Parallax Bicycles

The forgotten parallax bicycles. In June last year (that feels weird to type), I created another one of my little HTML5 Canvas demos - this time of some hills that parallaxly scroll with a bicycle on a road. I actually made it as a (birthday?) present for someone I seem to remember - and I even released it on my website here, but I somehow seem to have forgotten to post about it here on my blog, so I'm doing so now :-)

You can find it here: Parallax Bicycle

At the time the bicycle itself in particular was incredibly fiddly to get working right if I recall correctly. The hills in the background are procedurally generated too - they are on a (seamless!) loop and repeat every so often. The seamless part was also interesting to get working right.

Happy (belated) New Year!

A starry sky, randomly generated by the program below.

Happy new year! Sorry this post is a bit late - I was busily putting the above together after my last post on browserify. Anyway, I hope that you have a peaceful and awesome new year :-)

If you look up into the sky tonight, what do you see? Hopefully something more-or-less like my latest demo (just more detailed :P). As you can see in the above picture, this time, I've created a canvas animation of a starry sky. The stars even rotate and twinkle, and are slightly dimmer near the bottom-centre of the screen.

Check it out for yourself: Starry Sky

Now all it needs are some fireworks....

For the curious the code is available on my personal git server.

A first look a fractals - Shapes

My fractal shape generator.

Recently I took a little look at fractals, and in order to get my head around the recursive nature of drawing fractals, I wrote a small demo that draws a fractal like thing with shapes. It starts with a triangle, and draws a square at each corner. Then at the corner of each square, it draws a pentagon, and so the pattern continues. I thought it looked interesting, so I decided to share it here.

You can find it here: fractal shapes

You can also find it under the labs section of my homepage.

If anyone is interested in a more detailed explanation of how it works, I'd be happy to write a blog post about it. Comment below if you would like one.

Easy circles on the canvas with context.ellipse()

Ripples made using context.ellipse().

A while ago I was building a family tree viewer for an ACW (Assessed CourseWork) at University. Part of this ACW involved drawing faces inside ovals and using circles for various things. The suggested method here was using bezier curves (more on this on Wednesday), but I found another (much easier!) way of doing it that I thought others would find useful, so I am posting about it here.

Instead of using context.bezierCurveTo() and battling with control points, you can just use context.ellipse to add either a circle or an ellipse to the current path. Here's an extract fomr the wonderful MDN:

Syntax

void ctx.ellipse(x, y, radiusX, radiusY, rotation, startAngle, endAngle, anticlockwise);

Parameters

Parameter Explanation
x The x axis of the coordinate for the ellipse's center.
y The y axis of the coordinate for the ellipse's center.
radiusX The ellipse's major-axis radius.
radiusY The ellipse's minor-axis radius.
rotation The rotation for this ellipse, expressed in radians.
startAngle The starting point, measured from the x axis, from which it will be drawn, expressed in radians.
endAngle The end ellipse's angle to which it will be drawn, expressed in radians.
anticlockwise Optional. An Boolean which, if true, draws the ellipse anticlockwise (counter-clockwise), otherwise in a clockwise direction.

For example, here's how you'd draw a 100x200 red ellipse at (0, 0):

function renderEllipse(context)
{
    context.fillStyle = "#ff3300";
    context.beginPath();
    context.ellipse(0, 0, 100, 200, 0, 0, Math.PI * 2, false);
    context.fill();
}

The startAngle and endAngle functions work the same as the context.arc() command - they let you draw just part of a circle or ellipse instead of a full one. In the example above, I'm drawing a full one by starting at 0 and finishing at (360°).

I've built a simple 'ripples' demo that demonstrates context.ellipse() in action. Click anywhere on the screen to create a ripple. The background is made with a few quick radial gradiants that fade from a colour into transparency.

The Big Wheel in HTML5

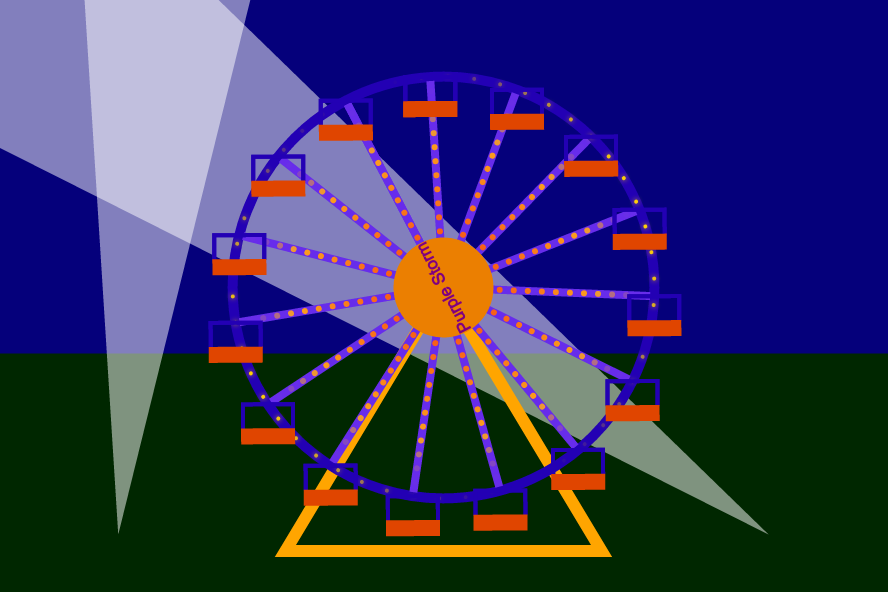
The Big Wheel in HTML5.

Just in time for Hull Fair to leave (yes I know they left last week), I've finished recreating the big wheel using the HTML5 Canvas. It's even got search lights and gradients.

Here's a link to the Big Wheel - Make sure that you use a recent browser (I'm using ES6 classes).

The basic pattern I used to create it was to break the scene down into different things, create a different class for each thing (except the background), and then break each thing down into its component parts. Each component part then got its own drawing function, which are then all called by the master renderer function for that class.

In order to position everything correctly, I abused context.save(), context.restore(), context.translate() and context.rotate(). Since the saving / restoring of the canvas state works like a stack, you can push as many drawing states to the stack as you like, and then pop them all off when you're done.

If anyone is interested in proper 'making of' post, please comment down below and I'll write one up!.

Voronoi Diagrams

This post was meant to come out on the 15th April... but I forgot to upload it to the server - I am posting now instead.

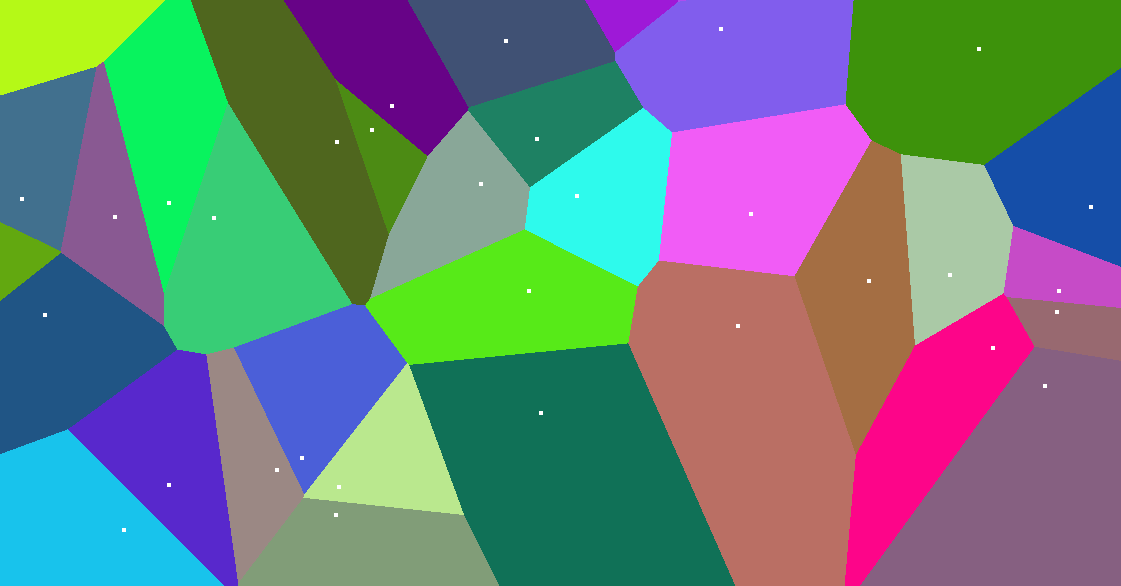
A Voronoi Diagram

Today I bring you another experiment with the HTML5 Canvas - Voronoi diagrams. A Voronoi diagram is an image where you scatter a bunch of points across an image, give each point a colour, and then colour each pixel according to which point is closest.

You can find my implementation here: Voronoi Diagram Generator

Initially I had trouble implementing this algorithm as I was trying to draw the outline of each of the cells first, but the explanation on it's Wikipedia article helped me to realise that there was a much easier way to do it :)

Next time I am trying to implement something that looks rather complicated and difficult I will definitely look for an alternative way of thinking about it.

For those of you who are interested, I used a technique called 32 bit canvas manipulation when writing this one. In a nutshell, this is a way of setting the red, green, blue, and alpha values of a pixel all at once, instead of in 4 separate operations - speeding up the whole rendering process.

Procedural Castle Generation

See the Pen Procedural Castle Generator by Starbeamrainbowlabs (@sbrl) on CodePen.

(Full screen)

The subreddit /r/proceduralgeneration has recently set up monthly challenges, and after missing the first one I decided to enter the second one. February's challenge was to generate random castles procedurally. The challenge was a lot of fun to take part in - my entry can be seen above.

I've published the code behind my entry on Github, too if you're interested in checking it out.

There were 15 other entries apart from mine. Here are all the entries next to each other:

All the entries

(Full size image [15MB])

I liked zapetch's because although it's 2D, the generated castles are very varied and they look nice and simple. Moosekk's was great too - The towers look complicated and it has buildings and trees too. Comment down below with your favourites. Why did you like them? Voting is now open - please go and vote here. Your votes will decide who gets to decide on the next challenge!

How it works

Since I can't write a post on something that I've done without explaining just a little bit about how it works, I've written up a quick overview below. If anyone is interested in a longer writeup or any specific part of the generator, please comment down below and I will get back to you as soon as I can.

The generator works by picking a random regular shape, and then randomly altering the location of each of the resulting corners a little bit. After that the towers (and their stairs) and the keep are generated, and the flags are placed. Since the wind only flows in one direction, all the flags all face the same direction.

The moat is generated as a closed smooth line, with it's control points generated by taking the corners of the castle and moving them a set distance away from the main keep. Since the moat originally was way too wide for the drawbridge (whose parameters don't actually have anything to do with the moat at all!), I added a pair of extra control points to the moat's smooth line to bring it closer to the 2 towers that sit either side of the entrance (the moat was built intentionally, right?).

Originally I was going to generate random buildings inside the castle and draw paths between them, the towers, the keep, and the entrance, but the maths behind that got rather complicated and I didn't have time to wrap my head around it. I was also going to generate random people in the castle too, but again I didn't have time for this. I'll probably come back to this at a later date and work on these features.

If this challenge looks interesting, then /r/proceduralgeneration are hosting another challenge this month - this time the challenge is to procedurally generate a side-scrolling platformer.

HTML5 Canvas Clouds

This week I have some clouds for you, rendered via the HTML5 <canvas>. I wrote these in early 2013. I have not had a lot of time this week, but something cool is coming soon :)

The clouds themselves are stored in an array, and are composed of a random number of circles. This array is then iterated over 60 times a second and rendered using the HTML5 <canvas>. setInterval() is used to schedule the drawing of the frames, but I really should go back and upgrade that to requestAnimationFrame().

Link: HTML5 Canvas Clouds

Imaanvas!

Today marks the release of a larger project that I have been doing, called Imaanvas. It has been in the works for months and is meant to be a web based version of a program called MSW Logo, which is now called FMS Logo. It has a few tweaks, though, to make it slightly easier to use. It was orignally written for a year 5 class in a primary school.

It also does not come with all the commands present in Logo, so if you find that a command is missing please comment below and I will try to add it for you as soon as I have some spare time. (You can also write the command yourself, and I can add it that way, but will probaby need the original source code for that - gulp is used to compact the code - send me an email if you want the code)

Immanvas is a horribly complex piece of code - so if you encounter any bugs (which is likely), please either leave a comment below, or send me an email. Remember to be descriptive about the bug that you have found, otherwise I won't be able to track it down and fix it! Also remember that Imaanavs is meant for modern browsers, so if Imaanvas doesn't work in your browser, try upgrading it to it's latest version.

This post is late since essential maintenance work had to be carried out to try and reduce the amount of spam that is being posted.

Behind the Parallax Stars

Unfortunately I have been busy, so I have been unable to write this post up until now. Anyway, welcome to the second technical post on this blog. This time, we will be looking behind the Parallax Stars.

The FPS and rendering time graphs are drawn by a slightly modified version of stats.js, by mrdoob. It's original github repository can be found here, and the slightly modified version can be found here. The modifications I made allow both the FPS graph and the rendering time graphs to be displayed at once.

The interesting code that makes the stars work is found in stars.js. The function is a constructor that returns an containing everything needed to make the stars appear and animate.

this.build = function() {
    this.data = [];

    for (var i = 0; i < this.number; i++)
    {
        this.data[i] = new star();
    }

    if(this.depthsort == true)
    {
        this.data.sort(depthsort);
    }
};
function star()
{
    this.z = Math.random()*(0.7) + 0.3;

    this.x  = rand(canvas.width);
    this.y  = rand(canvas.height);
    this.radius = Math.floor(this.z * 7);

    var r, g;
    r = rand(200, 255);
    g = rand(200, g - 20);

    this.colour = "rgb(" + r + ", " + g + ", " + 0 + ");"

    this.speed = this.z * 3;
}

The build() function contains some setup code that populates an array with stars, which are constructed by a different function, star(). Each star is assigned an x, y, and z co-ordinate. The x and y co-ordinates determine it's position on the screen. and the z co-ordinate determines it's size and speed. The stars are also given a colour too. The function rand() is a small utility function I sometimes use for generating random numbers:

// EXAMPLES:
// rand(256) returns a whole number between or equal to 0 and 255
// rand(100,201) returns a whole number between or equal to 100 and 200
// rand() returns a decimal between or equal to 0 and less than 1
function rand()
{
    // takes 0-2 arguments (numbers)
    var args = arguments, num;
    if (args[0] && !args[1]) { 
        num = Math.floor(Math.random()*(args[0]));
    } else if (args[0] && args[1]) {
        num = Math.floor(Math.random()*(args[1]-args[0])) + args[0];
    } else {
        num = Math.random();
    }
    return num;
}

The array that hold all the stars is also depth sorted before we start and on each frame to keep the stars in order since stars are leaving the screen and new one coming onto the screen on every frame. The standard array .sort() function is used, along with a custom sort function:

function depthsort(a,b) {
    if(a.z < b.z)
        return -1;
    if(a.z > b.z)
        return 1;
    else
        return 0;
}

The updates that happen every frame are split into two different functions. step() deals with incrementing co-ordinates and keeping the depth sorting up to date, and render() takes the current state and renders it on the canvas.

this.step = function() {
    for (var i = 0; i < this.data.length - 1; i ++)
    {
        this.data[i].x += this.data[i].speed;

        if(this.data[i].x > canvas.width + this.data[i].radius + 1)
        {
            this.data[i].x = new star();
            this.data[i].x = -this.data[i].radius - 1;

            if(this.depthsort == true)
            {
                this.data.sort(depthsort);
            }
        }
    }
}

The this.data array holds all of the stars. For each star, it's x value is incremented by it's speed. If this moves the star off the screen, we replace it with a new star that starts off at the left hand side. The stars are then depth sorted again to keep all the further away stars behind the stars that are (supposed to be) closer to the front.

this.render = function() {
    context.clearRect(0, 0, canvas.width, canvas.height);

    for (var i = 0; i < this.data.length - 1; i ++)
    {
        context.globalAlpha = 1;
        context.globalCompositeOperation = "destination-out";

        context.beginPath();
        context.arc(this.data[i].x, this.data[i].y, this.data[i].radius, 0, Math.PI*2, true);
        context.closePath();
        context.fill();

        context.globalAlpha = this.data[i].z;
        context.globalCompositeOperation = "source-over";

        context.fillStyle = this.data[i].colour;

        context.beginPath();
        context.arc(this.data[i].x, this.data[i].y, this.data[i].radius, 0, Math.PI*2, true);
        context.closePath();
        context.fill();
    }
}

To start off the rendering, the canvas is cleared. After that, For each star, a hole in the canvas is cleared with the destination-out drawing mode. The reason for this is that the z co-ordinate is also used as an alpha value for each star to make it dimmer the further away it is. This gives a slightly more realistic 3d appearance. After clearing a hole, the drawing mode is rest to the default (source-over), and the alpha and fill colours are set up according to the star's current z co-ordinates and colour respectively. Then the star is drawn. Since when this script was written we did not have a canvas drawing function to draw an ellpise, the context.arc(this.data[i].x, this.data[i].y, this.data[i].radius, 0, Math.PI*2, true); code is used to draw circles via context.beginPath() and context.fill().

Finally, One nice neat update() function is provided that calls render() and step() in sequence:

this.update = function() {
    this.render();
    this.step();
}

That concludes this technical post! If you have any questions, please post them below and I will try my best to answer them.

Art by Mythdael