Starbeamrainbowlabs

Stardust
Blog


Archive


Mailing List Articles Atom Feed Comments Atom Feed Twitter Reddit Facebook

Tag Cloud

3d 3d printing account algorithms android announcement architecture archives arduino artificial intelligence artix assembly async audio automation backups bash batch blender blog bookmarklet booting bug hunting c sharp c++ challenge chrome os cluster code codepen coding conundrums coding conundrums evolved command line compilers compiling compression conference conferences containerisation css dailyprogrammer data analysis debugging defining ai demystification distributed computing dns docker documentation downtime electronics email embedded systems encryption es6 features ethics event experiment external first impressions freeside future game github github gist gitlab graphics guide hardware hardware meetup holiday holidays html html5 html5 canvas infrastructure interfaces internet interoperability io.js jabber jam javascript js bin labs latex learning library linux lora low level lua maintenance manjaro minetest network networking nibriboard node.js open source operating systems optimisation outreach own your code pepperminty wiki performance phd photos php pixelbot portable privacy problem solving programming problems project projects prolog protocol protocols pseudo 3d python reddit redis reference release releases rendering research resource review rust searching secrets security series list server software sorting source code control statistics storage svg systemquery talks technical terminal textures thoughts three thing game three.js tool tutorial twitter ubuntu university update updates upgrade version control virtual reality virtualisation visual web website windows windows 10 worldeditadditions xmpp xslt

Jabber & XMPP: A Lost Protocol

Welcome to a special tutorial post here at starbeamrainbowlabs.com. In this post, we will be exploring an instant messaging protocol known as XMPP.

The XMPP logo

Today, you will probably use something like Skype, Gmail, or possibly FaceTime to stay in touch with your friends and family. If you were to rewind to roughly the year 2000, however, you would find that none of the above existed yet. Instead, there was something called XMPP. Originally called Jabber, XMPP is an open decentralised communications protocol (that Gmail's instant messaging service uses behind the scenes!) that allows you to stay in touch with people over the internet.

Identifying Users

There are several programs and apps that have XMPP support built in, but first let's take a look how it works. As I mentioned above, XMPP is decentralised. This means that there is no central point at which you can get an account - in fact you can create your very XMPP server right now! I will go into the details of that in a future post. Having multiple servers also raises the question of identification. How do you identify all these XMPP users at hundreds, possibly thousands of server across the globe?

Several account at 2 different servers

Thankfully, the answer is really quite simple: We use something called a Jabber ID (JID), which looks rather like an email address, for example: [email protected]. Just like an email address, the user name comes before the @ sign, and the server name comes after the @ sign.

Connecting People

Now that we know how you identify an XMPP user, we can look at how users connect and talk to each other, even if they have accounts at different servers. Connecting users is accomplished by 2 types of connections: client to server (c2s) and server to server (s2s) connections, which are usually carried out on ports 5222 and 5269 respectively. The client to server connections connect a user to their server that they registered with originally, and the server to server connections connect the user's server to the server that hosts the account to the other user that they want to talk to. In this way an XMPP user may start a conversation with any other XMPP user at any other server!
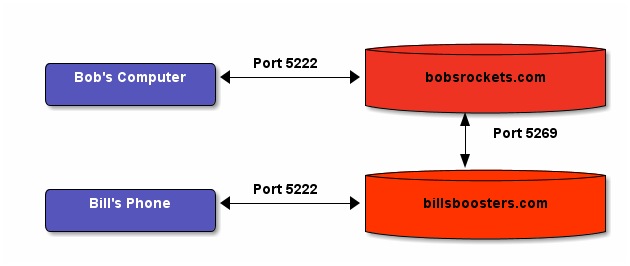
A visualisation of the example below

Here's an example. Bob is the owner of a company called Bob's Rockets and has the XMPP account [email protected]. He wants to talk to Bill, who owns the prestigious company Bill's Boosters who has the JID [email protected]. Bob will log into his XMPP account at bobsrockets.com over port 5222 (unless he is behind a firewall, but we will cover that later). Bill will log into his account at billsboosters.com over the same port. When Bob starts a chat with Bill, the server at bobsrockets.com will automagically establish a new server to server connection with billsboosters.com in order to exchange messages.

Note: When starting a conversation with another user that you haven't talked to before, XMPP requires that both parties give permission to talk to one another. Depending on your client, you may see a box or notification appear somewhere, which you have to accept.

Get your own!

Now that we have taken a look at how it works, you probably want your own account. Getting one is simple: Just go to a site like jabber.org and sign up. If you stick around for the second post in this series though I will be showing you how to set up your very own XMPP server (with encryption).

As for a program or app you can use on your computer and / or your phone, I recommend Pidgin for computers and Xabber for Android phones.

Next time, I will be showing you how to set up your own XMPP server using Prosody. I will also be showing you a few of the add-ons you can plug in to add support for things like multi-user chatrooms (optionally with passwords), file transfer proxies, firewall-busting BOSH proxies, and more!

IP version tester

You may have heard already - we have run out of IPv4 addresses. An IPv4 address is 32 bits long and looks like this: 37.187.192.179. If you count up all the possible combinations (considering each section may be between 0 and 255), missing out the addresses reserved for special purposes, you get about 3,706,452,992 addresses.

The new system that the world is currently moving to (very slowly mind you) is called IPv6 and is 128 bits long. They look like this: 2001:41d0:52:a00::68e. This gives us a virtually unlimited supply of addresses so we should never run out.

The problem is that the world is moving far too slowly over to it and you can never be sure if you have IPv6 connectivity or not. I built a quick IP version tester to solve this problem. I know there are others out there, but I wanted to build one myself :)

You can find it here: Ip Version Tester.

TraceRoutePlus

Hello!

Today I have for you a traceroute tool that I have built. I made it mainly for educational purposes, since I wanted to test the code behind it ready for something slightly more complicated.

Here is an example:

C:\>tracerouteplus github.com
Traceroute Plus
---------------
By Starbeamrainbowlabs <https://starbeamrainbowlabs.com>

=== github.com ===
 1: xxx.xxx.xxx.xxx 1ms
 2: xxx.xxx.xxx.xxx 33ms
 3: xxx.xxx.xxx.xxx 36ms
 4: xxx.xxx.xxx.xxx 54ms
 5: 4.69.149.18     119ms
 6: 4.53.116.102    115ms
 7: 192.30.252.207  118ms
 8: 192.30.252.130   118ms
=== github.com end ===

You can download the latest version of the tool from my repository. Instructions can be found in the download section of the README.

The code is up on GitLab, and pull requests are welcome :)

Edit: Moved to GitLab from GitHub.

Finding Favicons with PHP

There hasn't been a post here for a little while because I have been ill. I am back now though :)

While writing more Bloworm, I needed a function that would automatically detect the url of the favicon that is associated with a given url. I wrote a quick function to do this a while ago - and have been improving it little by little.

I now have it at a point where it finds the correct url 99% of the time, so I thought that I would share it with you.

/*
 * @summary Given a url, this function will attempt to find it's correspending favicon.
 *
 * @returns The url of the corresponding favicon.
 */
function auto_find_favicon_url($url)
{
    if(!validate_url($url))
        senderror(new api_error(400, 520, "The url you specified for the favicon was invalid."));

    // todo protect against downloading large files
    // todo send HEAD request instead of GET request
    try {
        $headers = get_headers($url, true);
    } catch (Exception $e) {
        senderror(new api_error(502, 710, "Failed to fetch the headers from url: $url"));
    }
    $headers = array_change_key_case($headers);

    $urlparts = [];
    preg_match("/^([a-z]+)\:(?:\/\/)?([^\/?#]+)(.*)/i", $url, $urlparts);

    $content_type = $headers["content-type"];
    if(!is_string($content_type)) // account for arrays of content types
        $content_type = $content_type[0];

    $faviconurl = "images/favicon-default.png";
    if(strpos($content_type, "text/html") !== false)
    {
        try {
            $html = file_get_contents($url);
        } catch (Exception $e) {
            senderror(new api_error(502, 711, "Failed to fetch url: $url"));
        }
        $matches = [];
        if(preg_match("/rel=\"shortcut(?: icon)?\" (?:href=[\'\"]([^\'\"]+)[\'\"])/i", $html, $matches) === 1)
        {
            $faviconurl = $matches[1];
            // make sure that the favicon url is absolute
            if(preg_match("/^[a-z]+\:(?:\/\/)?/i", $faviconurl) === 0)
            {
                // the url is not absolute, make it absolute
                $basepath = dirname($urlparts[3]);

                // the path should not include the basepath if the favicon url begins with a slash
                if(substr($faviconurl, 0, 1) === "/")
                {
                    $faviconurl = "$urlparts[1]://$urlparts[2]$faviconurl";
                }
                else
                {
                    $faviconurl = "$urlparts[1]://$urlparts[2]$basepath/$faviconurl";
                }
            }
        }
    }

    if($faviconurl == "images/favicon-default.png")
    {
        // we have not found the url of the favicon yet, parse the url
        // todo guard against invalid urls

        $faviconurl = "$urlparts[1]://$urlparts[2]/favicon.ico";
        $faviconurl = follow_redirects($faviconurl);
        $favheaders = get_headers($faviconurl, true);
        $favheaders = array_change_key_case($favheaders);

        if(preg_match("/2\d{3}/i", $favheaders[0]) === 0)
            return $faviconurl;
    }

    return $faviconurl;
}

This code is pulled directly from the Bloworm source code - so you will need to edit it slightly to suit your needs. It is not perfect, and will probably will be updated from time to time.

Following Redirects in PHP

Recently I have found that PHP sometimes doesn't follow redirects (e.g. the get_headers() function). So I wrote this quick function to follow a url's redirects to a certain depth:

/*
 * @summary Follows a chain of redirects and returns that last url in the sequence.
 * 
 * @param $url - The url to start at.
 * @param $maxdepth - The maximum depth to which to travel following redirects.
 * 
 * @returns The url at the end of the redirect chain.
 */
function follow_redirects($url, $maxdepth = 10, $depth = 0)
{
    //return the current url if we have hit the maximum depth
    if($depth >= $maxdepth)
        return $url;

    //download the headers from the url and make all the keys lowercase
    $headers = get_headers($url, true);
    $headers = array_change_key_case($headers);
    //we have a redirect if the `location` header is set
    if(isset($headers["location"]))
    {
        return follow_redirects($headers["location"], $maxdepth, $depth + 1);
    }
    else
    {
        return $url;
    }
}

For example, you could do this:

follow_redirects("https://example.com/some/path", 5);

That would follow the redirects, starting at https://example.com/some/path, to a maximum depth of 5 urls.

When I learn networking in C♯ (and if it doesn't follow redirects), I will rewrite this function in C♯ for you.

Sending POST Requests with curl

This is a quick post about sending POST requests via the command line. I have been using curl for a while now - and I find it to be a good alternative to wget. I have just found out how to use it to send a POST request from the command line, and I thought that I would share my findings here.

Sending a POST request is really quite simple:

curl -X POST --data-binary "@$input_filename" -o $output_filename $url
  • $input_filename is the name of the filename that contains the data that you want to send.
    • @- can be used to specify stdin, allowing you to pipe the output of the previous command into curl.
    • You can also drop at @ symbol and hard-wire the data you want to send into the command itself.
  • $output_filename is the name of the file you want to save the response to. You can drop -o $output_filename if you want curl to output he result to he standard output for further processing.

If you find that you get some king of error message from the above, you may need to add --header "Expect: 100-continue" just before the $url - some servers require this.

The --data-binary is rather important, as if you use --data on it's own, line breaks are not preserved for some bizarre reason.

I am finding that curl is much more powerful that I first expected, as it understands just about any protocol you care to name....I need to experiment with it further.

Curl also has a modular structure to it's command line arguments, so you can tack and extra setting on the end and it will work exactly as you would expect it to (most of the time!).

Art by Mythdael